Gherman Umnov, Podolsk
From EG No. 137 - (Vol.IX), July 2000
The outcome of any position of reciprocal zugzwang hangs on the turn to play. Most of the time study composers strive to carry this through by creating a try in which White, having the move, is in zugzwang, while in the actual solution the same position occurs but this time with Black having the move. Studies have been composed, and not a few of them, where the reciprocal zugzwang is dragged out for several moves, with Black every time lacking a neutral, in fact useful, move. Hm. Let's see if that is always so.
*****************************
U1 Gh. A. Umnov
Springaren, ix 1999
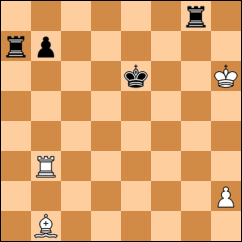
h6e6 0710.11 4/4 Draw
*****************************
U1: 1.Rxb7 Rh8+ 2.RH7 aRxh7+ 3.Bxh7, with:
- Kf7 4.h3! Kf6 5.h4 Kf7 6.h5 Kf6 stalemate, or
- Kf6 4.h4! Kf7 5.h5 Kf6 stalemate again.
In both lines in U1 we see after White's 4th a position of 'prolonged' reciprocal zugzwang.
Now put wP on a2 instead of h2, to create the schema U2, with Black to move.
*****************************
U2 (Gh. A. Umnov - matrix)
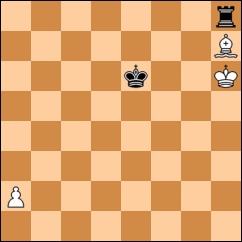
h6e6 0310.10 3/2 BTM, Draw
*****************************
U2: After 1...Kf7 we have 2.a4! Kf6 3.a5 Kf7 4.a6 Kf6 5.a7, and it's drawn, while after 1...Kf6 2.a3! and so on, also with a draw.
In U2 it is not so much wB that is paralysed as bR which is excluded from play, having no useful move. Obviously if Black had so much as a single neutral move of the rook without unpinning wB, then White would be winkled out of his draw.
But is this really so obvious?
*****************************
U3 Gh. A. Umnov first publication
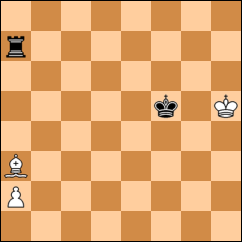
h5f5 0310.10 3/2 Draw
*****************************
U3: White's choices are bare - he's under the cosh of mate on the move, and his bishop hangs. After either 1..Bc1 or 1.Bf8, Black will give check with his rook, pinning the bishop for ever. Then the white a-pawn will sooner or later become a sacrificial offering. However, in contrast to U2 all the pieces are one rank lower down the board, and this gives the rookm elbow-room for a temporising a move on top of bK's option to oscillate. So there's scarcely anything to choose between 1.Bc1 and 1.Bf8 - they are as bad as each other. Resign, then? Well, with nothing to lose, perhaps something will turn up. 1.Bc1? Rc7! Aha! Black is in no hurry with his check and bishop pin. He's playing cat and mouse, spinning out the agony.
2. Be3 Re7! Now there are two continuations for us to look at:
- 3.Bc1 Re1! 4.Bg5 Rg1! 5.Be7 (Bh4,Rg8;) Rg7! 6.Bf8 Rg8! 7.Bh6 Rg1! and Black wins, or
- 3.Bg5 Rg7! 4.Be3 (Bh6,Rg1;) Rg3! 5.Bf2 Rg2! 6.Be1 Rh2+! 7.Bh4 Rxa2 8.Bg3 Ra1 9.Kh6 Rh1+ 10.Kg7 Rg1, and again Black wins. [A pity that 4.Be3 Re7 transposes into the other line. AJR]
In this pair of try echo-variations Black forces wB to play to the g5 square so that it can be attacked to allow bR to cross the board's equator. But why should Black spurn the pin? Let's take a look at the other first move:
1.Bf8! with:
- Rh7+ 2.BK6 Rh8 (or Kf6;).
What now? 3.a3!! It's a paradox, but here's another position of reciprocal zugzwang: Rh7 (or Kf5;) 4.a4 Rh8 (or Kf6;) 5.a5 Rh7 (or Kf5;) 6.a6 Rh8 (or Kf6;) 7.a7, and this time the zugzwang can no longer be deferred, and it's decisive. Note 3.a4? Rh7 4.a5 Kf6 5.a6 Kf5 6.a7 Rxa7, and Black
wins.
- Rf7 2.Bh6 Rh7. What's this? It's Black's own king that's in the way of the rook's otherwise winning transfer to the southern hemisphere, whereas in the first line it's the white men that rule out the same manoeuvre. 3.a4! 3.a3? Kf6 4.a4 Kf5 5.a5 Kf6 6.a6 Kf5 7.a7 Rxa7 wins. Rh8 (Kf6) 4.a5 Rh7 (Kf5) 5.a6 Rh8 (Kf6) 6.a7, and it's the self-same zugzwang, with Black paying the drawing penalty.
The try 1.Bc1? loses for White because his pawn stays rooted to the subsequently vulnerable a2 square while Black threatens checkmate and harasses the white bishop. In the solution, on the other hand, White paradoxically draws precisely because his pawn is on a2, keeping the tempo-choice (of moving up one square or two) up his sleeve. Curiously, in the tries, whether Black allows the excelsior to run to completion or captures the pawn when it reaches a7 is largely irrelevant, but if he captures on the promotion square a fresh little study (U4) arises.
*****************************
U4 Gh. A. Umnov
first publication
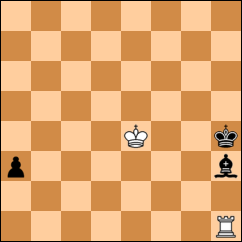
e4h4 0130.01 2/3 Win
*****************************
U4: 1.Kf3! a2 2.Kf4. We have already met this position in U3, but with colours reversed. a1Q 3.Rxa1 Bg2 4.Ra5! Bf1/i 5.Rg5! Kh3 6.Rg3+ Kh2 (Kh4; Rg1) 7.Kf3 Bc4 8.Kf2
i) Bh1 5.Ra7 Kh3 6.Rh7+ Kg2 7.Rh8 Kg1 8.Kg3 and 9.Rf8.
It's a pity this study steps outside our theme, but U3 in contrast to U2 demonstrates once again that what is obvious is not always the whole truth. Which has to be the credo of every composer.
[See also EG135.11444.]
No comments:
Post a Comment